
Unity
Play a live demo -> https://unitysdk.web.app
Code Repo
https://github.com/SphereGlobal/unity-sdk
Supported Platforms:
- Web
- iOS (iOS 12+)
- Android (Android 8.1 and above, API level 27+)
- MacOS Standalone
- Windows Standalone
Guide for Basic Setup
Prerequisite: Installation of Newtonsoft Json Package
- Navigation to Package Manager:
- Navigate through
Window > Package Manager
- Navigate through
- Package Addition:
- Select
+ > Add package from git URL. - Input
com.unity.nuget.newtonsoft-jsonand proceed.
- Select
Step 1: Import SphereOne SDK
- Acquisition of SDK:
- Download the
.unitypackagefile from the Releases page on the official GitHub repository, typically opting for the most recent version.
- Download the
- Package Addition to Unity Project:
- Navigate via
Assets > Import Package > Custom Package. - Select the
.unitypackagefile previously downloaded and clickOpen. - Retain the default files selected and click
Import.
- Navigate via
Step 2: SDK Installation and Configuration
- SDK Installation Confirmation:
- Post-import, the SDK should be successfully installed, introducing a new
Sphere Onehelper to the main menu.
- Post-import, the SDK should be successfully installed, introducing a new
- Utilization of SDK:
- Integrate the
SphereOneManagerprefab into your initial scene to commence usage of the SDK.
- Integrate the
Do not rename the SphereOneManager gameObject
Additional Step for Platform Specific Setup
Should you be utilizing the Unity SDK on Web, Mobile, or Desktop, kindly refer to the proper section below to complete the setup process.
Web Setup
Preliminary Step: Switching to SphereOne WebGL Template
- Navigational Path:
- Proceed through
Edit > Project Settings > Player > WebGL Tab > Resolution and Presentation.
- Proceed through
- Template Selection:
- Opt for the SphereOne template.
Configuration: Establishing Default Values
Note: While the following values are recommended defaults, they may be adjusted to cater to your game's specific requirements.
Additional information about WebGL Templates can be found in the Unity Docs here and here.
Parameters for Configuration
- Optimize for Pixel Art (Boolean): Enabling this will set the data-pixel-art attribute on the element.
- Lock Aspect Ratio (Boolean): When set to
true, this maintains a consistent aspect ratio for your game, based on the predeterminedDefault Canvas Width/Height. The game will scale proportionally relative to the window size. - Full Window Size (Boolean): If enabled (
true), the game will occupy the entirety of the webpage. - Background (Hex Color): Define a color for the webpage background utilizing its hexadecimal code.
Mobile Setup
Overview: Custom Redirect Scheme
Utilizing a custom Redirect Scheme serves to distinguish your application from others installed on a user's device, enhancing user experience and navigation precision. Also, it serves as the return point in the authentication flow.
Configuration Process within SphereOneManager Editor
- Navigating to
SphereOneManagerEditor- Engage with the
SphereOneManagereditor to initiate the configuration of the customRedirect Scheme.
- Engage with the
- Updating the Android Manifest File (Android ONLY, Skip for iOS)
- Ensure to modify the scheme value within the Android manifest file, located at
Assets/Plugins/Android/AndroidManifest.xml.
- Ensure to modify the scheme value within the Android manifest file, located at
Desktop Setup
Client Specific Configuration
Introduction to SphereOneManager
SphereOneManagerThe SphereOneManager serves as the pivotal interface through which you will interact with the SDK. It is a singleton MonoBehavior, accessible universally within your code, and remains instantiated across scenes utilizing DontDestroyOnLoad(). It is imperative to place it within your starting scene.
Configuration Essentials
- API Key Addition
- Ensure to incorporate your API key, which is provided by SphereOne.
- Login Mode Selection
- Popup Mode
- Activation: This mode initiates an authentication popup upon calling
SphereOneManager.Instance.Login(). - User Journey: Post player login, it will redirect them back to your game and load their credentials.
- Activation: This mode initiates an authentication popup upon calling
- Popup Mode
Popup ModeConfiguration- If utilizing
Popup mode, it is mandatory to add yourClient IdandRedirect URL(the URL where your game is deployed orhttp://localhost:{portNumber}for testing purposes).
- If utilizing
There is another Login Mode option,
Slideout Mode. However, due to an unresolved technical incompatibility, please usePopup Modeinstead.
Security and Credential Management
Upon authentication, the SDK will encrypt the player's credentials and securely store them in the browser's local storage.
Editor and Production Environments
Editor Environment
Local Testing in Editor (Play Mode)
Data Source: The mode utilizes mock data extracted from multiple JSON files, located within SphereOne / Scripts / MockData.
Pre-Build Requirement: It is imperative to switch to the production environment prior to initiating the build process.
Production Environment
Connectivity and Data Usage
API Connection: This environment establishes a connection with the production SphereOne API.
Data Authenticity: It utilizes real, live data from the aforementioned API.
Utilizing the SDK
Accessing the SDK:
using SphereOne;

... // your exsting imports

SphereOneManager.Instance
Login
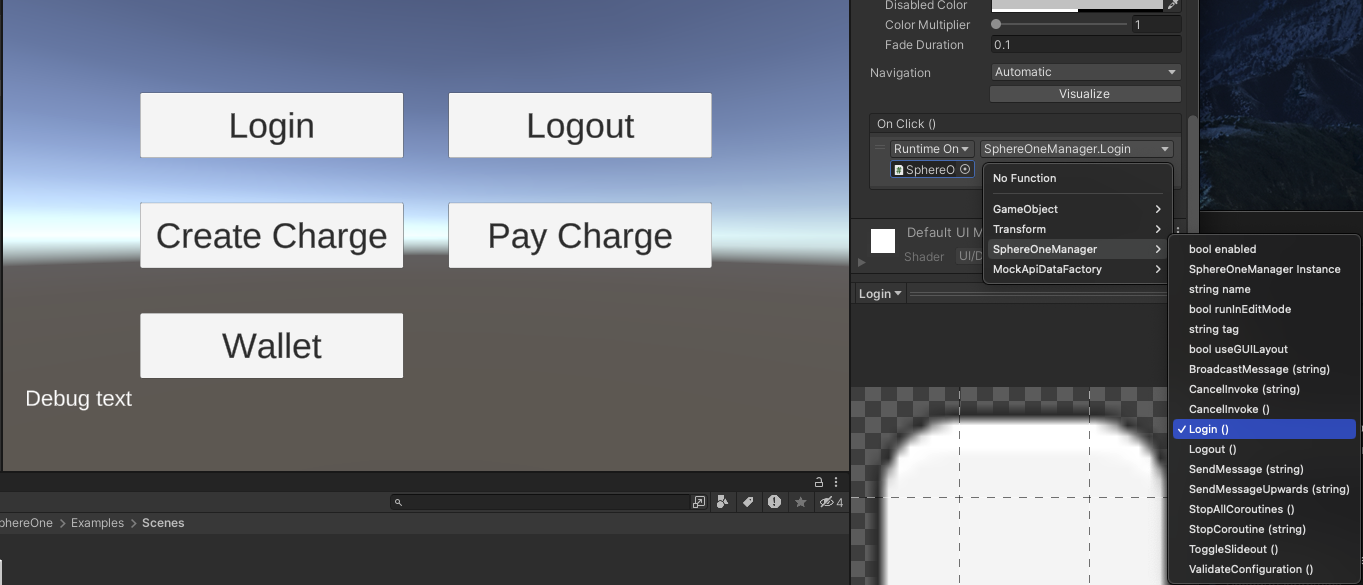
To login with the SDK, you can either:
- Call
SphereOneManager.Login()in your own custom scripts. - Or attach it onto a
GameObjectbutton'sonClickevent
Events
The SDK provides delegate events that your scrips can observe.
These events trigger when new data is fetched from the Sphere One API. This happens during the awake() method of SphereOneManager, or when you manually call to fetch new data.
void OnEnable()
{
  SphereOneManager.onUserLoaded += UserLoaded;
  SphereOneManager.onUserLogout += ClearAll;
  SphereOneManager.onUserWalletsLoaded += WalletsLoaded;
  SphereOneManager.onUserBalancesLoaded += AccountsLoaded;
  SphereOneManager.onUserNftsLoaded += NftsLoaded;
}

void OnDisable()
{
  SphereOneManager.onUserLoaded -= UserLoaded;
  SphereOneManager.onUserLogout -= ClearAll;
  SphereOneManager.onUserWalletsLoaded -= WalletsLoaded;
  SphereOneManager.onUserBalancesLoaded -= AccountsLoaded;
  SphereOneManager.onUserNftsLoaded -= NftsLoaded;
}

void UserLoaded(User user)
{
  // your custom logic with User Data
}

void WalletsLoaded(List<Wallet> wallets)
{
  // your custom logic with User Wallets
}

...
Create a Charge/Transaction
var chargeItems = new List<ChargeItem>
{
  new ChargeItem
  {
      name = "Your Item",
      image = "https://your-image-url.somewhere.com",
      amount = 0.9,
      quantity = 1,
   }
};

var chargeRequest = new ChargeReqBody
{
    chain = SupportedChains.SOLANA,
    symbol = "SOL",
    amount = 0.9,
    tokenAddress = "So11111111111111111111111111111111111111112",
    items = chargeItems,
    successUrl = "https://your-website.com/success",
    cancelUrl = "https://your-website.com/cancel",
};

var isTest = false;
var charge = await SphereOneManager.Instance.CreateCharge(chargeRequest, isTest);

if (charge == null) {
  // Handle the error
  return;
}

Debug.Log(charge.ToString());
Pay for the Created Charge/Transaction
var payment = await SphereOneManager.Instance.PayCharge(charge.chargeId);

if (payment == null)
{
  // Handle the error
  return;
}

Debug.Log(payment.ToString());

// Payment has been submitted, it will take a few minutes to process

// At this point, your game server should listen to the webhook from sphereone (setup in the merchant dashboard)
// Sphereone will trigger the webhook when the payment completes successfully or fails
Updated 6 months ago