
Quickstart: Login
This page will help you to understand how to integrate and use our custom Login.
This guide details the SphereOne Login user experience so that users are be able to login to their account from third party applications like yours. If you they don't have an account, registering an account with us is simple.
There is a number of ways of integrations for third-party client applications to integrate with SphereOne Login. The most readily available is through SphereOne's own applications - SphereOne Wallet site and the SphereOne Merchant Dashboard. For other methods, they are still a work in progress, labeled as "TBD" later below in this doc.
SphereOne Applications
As mentioned, the most readily available login options are through SphereOne's own applications. Either the SphereOne Wallet site and Merchant Dashboard follow the same register/login process. Please see below for the required steps to register and login into SphereOne.
Step 1 - Register and Create New Account
Initially, the Login screen will prompt you to complete this form. If user don't already have an account, register a new account by clicking on the bottom right option titled "Sign up".
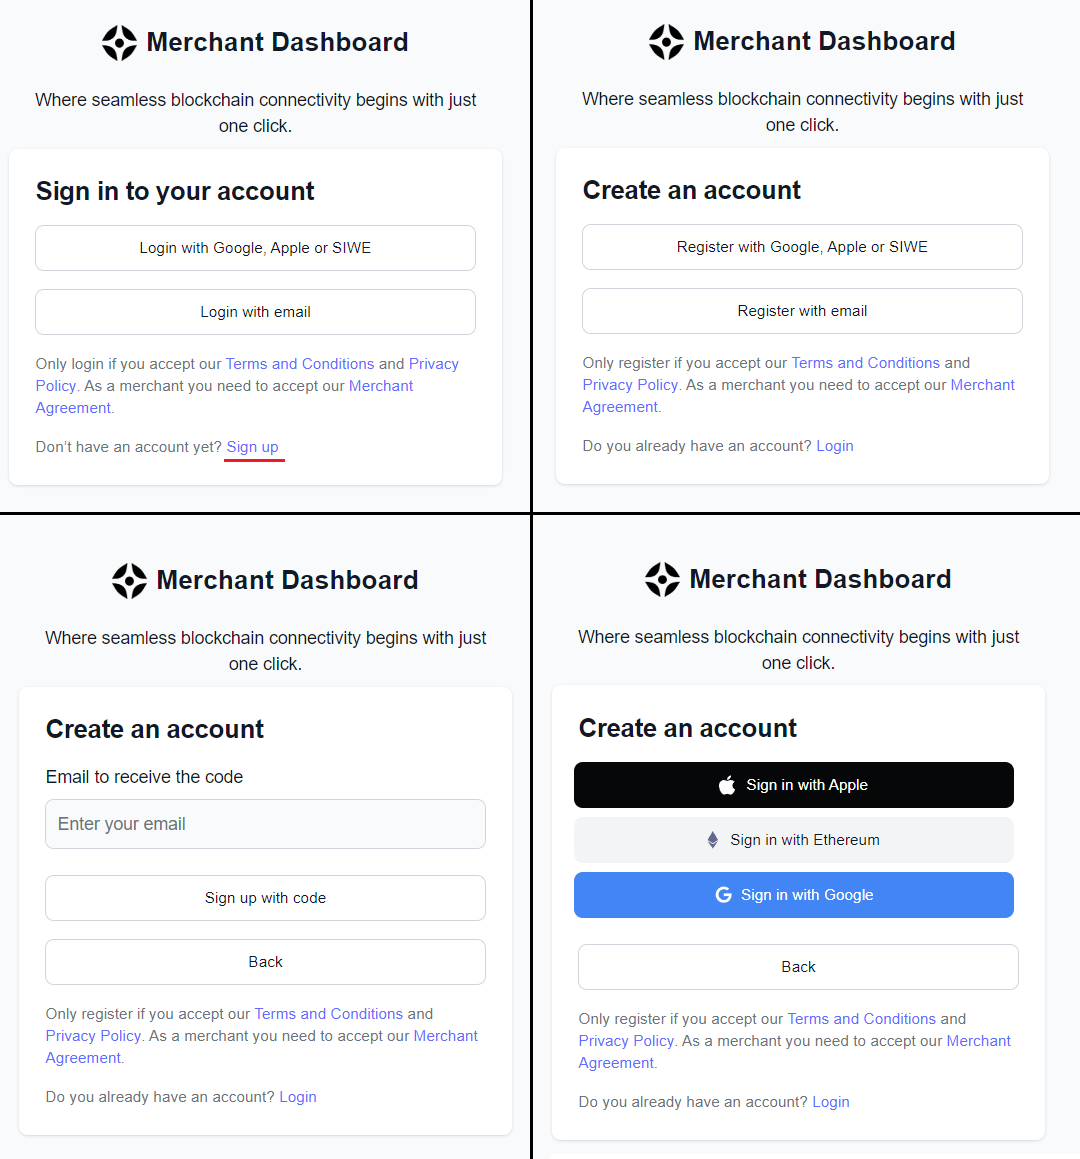
Note: If you already have an account with us, you don't need to register again from a third party application. This should only be done if you have never created a SphereOne account.
If you choose the 'Email' method in the registration form, after clicking 'Sign up,' the user will need to complete a verification process in order to successfully create a new account. For social sign-up methods like Google or Apple Accounts, you can streamline the registration process.
Note: This step is not required for social sign-up methods (Sing in with Ethereum excluded) and in some cases, you won't be asked to enter your email. After account registration, you will need to log in.
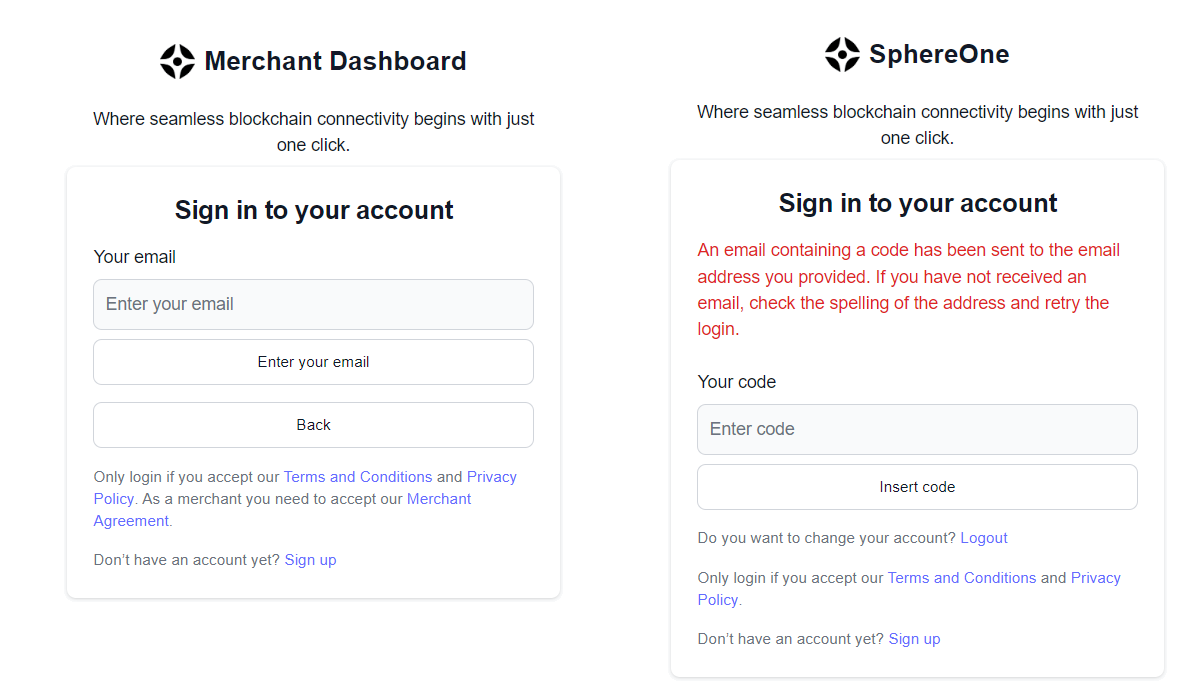
Step 2 - Login with your Account
Once the account is created, the user can begin logging in. A form like the one above will be displayed, where the user must enter their recently used email to create the account and wait for a 6-digit code to arrive.
Step 3 - Add a Pin Code to your account
After the first login process, the user will need to add a pin code to their account. This pin code is necessary for authorization-related wallet operations, such as exporting private keys or making payments. This step applies to both merchant dashboard sign-ups and the SphereOne Wallet website.

Step 4 - Add a phone number to your account
The last step is to link your phone number. You can skip this step, but we recommend linking your number as it will be the only backup mechanism you will have to reset your PIN code if it is lost.
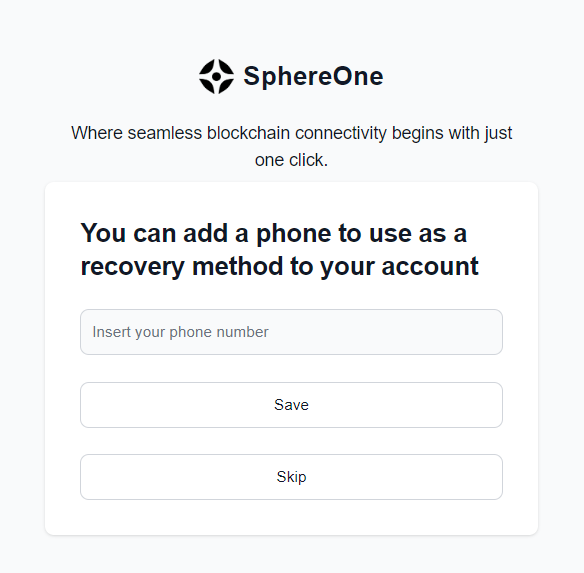
NOTE: Without a PIN code you will not be able to make payments or export your wallets!
Third Party Integrations
For clients or other users who want to integrate SphereOne Login into their own products, they can follow these steps below.
NOTE: Please be aware that some options aren't available yet, still works in progress. If they're blank with
"TBD", please be considerate. They will be available and updated in the near future.
Web Projects
For clients who want to integrate SphereOne Login with their websites, there are many backend providers. For this example, we'll show an integration of SphereOne Login with Firebase. More examples will be available in the near future.
While the actual implementation may be different between backend providers, the concepts are very much similar and shared on a high-level, since SphereOne is simply leveraging OAuth concepts.
For ReactJS + Firebase
Step 1: New ReactJS Project
For this SphereOne-Firebase integration example, let's start a new project. We'll use ReactJs as our frontend, configured with Typescript. And if you have an existing project or don't want it in Typescript, feel free to change some of the commands and/or follow along.
npx create-react-app sphereone-login-integrate-example --template typescript
cd sphereone-login-integrate-example
If we do npm start, we should see the default create-react-app screen in our browser.

Next, let's add firebase to the project.
npm install firebase
Step 2: Initialize Firebase Config
Then, in our project, we would need to initialize firebase.
import { initializeApp } from 'firebase/app';
import "firebase/auth";
import { getAuth } from 'firebase/auth';

// TODO: Replace the following with your app's Firebase project configuration
const firebaseConfig = {
  apiKey: "FIREBASE_API_KEY",
  authDomain: "FIREBASE_AUTH_DOMAIN",
  projectId: "FIREBASE_PROJECT_ID",
  storageBucket: "FIREBASE_STORAGE_BUCKET",
  messagingSenderId: "FIREBASE_MESSAGING_SENDER_ID",
  appId: "FIREBASE_APP_ID",
  measurementId: "FIREBASE_MEASUREMENT_ID"
};

const firebase = initializeApp(firebaseConfig);
export const auth = getAuth(firebase);
You can find the values to initialize the firebase config from the firebase console Project Setting.
For this example, we're using the latest Firebase web SDK version, which defaults to the Web Modular API. You can find the differences here: Firebase v8 vs v9.
Step 3: Create New Firebase Project
Also, if you have an existing firebase project that you want to reuse, go ahead. But if you are following along with a new firebase project, then please follow these Firebase Documentation instructions on how to add Firebase to a javascript project.
Then, we create a web app inside our firebase project. Give it a name, something like sphereone-login-test-web. From here, we should be able to get the values we need to initialize our firebase config on our example frontend project.
Step 4: Update App.tsx with Login Button
Once firebase config is initialized on the frontend, we can modify the existing App.tsx file to create a button to sign in and an internal state to reflect whether user is signed in or not.
import React from 'react';
import logo from './logo.svg';
import './App.css';

function App() {
  // We will use this to track if user is signed in or not.
  const [isSignedIn, setIsSignedIn] = React.useState(false);

  return (
    <div className="App">
      <header className="App-header">
        <img src={logo} className="App-logo logo-spin" alt="logo" />
        {isSignedIn ? "You are signed in!" : "You are not signed in!"}
        <PrimaryButton
          onClick={async () => {
            console.log('You clicked Login!');
          }}
        >
          Login!
        </PrimaryButton>
      </header>
    </div>
  );
}

// Our reuseable Button component.
const PrimaryButton = ({
  children,
  onClick,
}: {
  children: React.ReactNode;
  onClick?: (...args: any) => void;
}) => {
  return (
    <div
      style={{
        backgroundColor: "blue",
        borderRadius: "5px",
      }}
      onClick={() => { onClick && onClick() }}
    >
      {children}
    </div>
  );
};

export default App;
Step 5: Add Firebase Auth with OAuthProvider
Next, let's add firebase auth, so we can actually sign in.
import React from 'react';
import logo from './logo.svg';
import './App.css';

// We need to import these from `firebase/auth`.
import { OAuthProvider, signInWithRedirect } from "firebase/auth";
// In a previous step, we initialized our firebase inside of ./utils/firebase.ts and import it here
import { auth } from './utils/firebase';

function App() {
  // We need to initialize our OAuthProvider here, which will let Firebase know
  // which auth provider to use.
  // This correlates to the "providerID" for our OpenID Connect provider in the Firebase Console.
  const provider = new OAuthProvider('oidc.sphereone');
  const [isSignedIn, setIsSignedIn] = React.useState(false);

  return (
    <div className="App">
      <header className="App-header">
        <img src={logo} className="App-logo logo-spin" alt="logo" />
        {isSignedIn ? "You are signed in!" : "You are not signed in!"}
        <PrimaryButton
          onClick={async () => {
            console.log('You clicked Login!');
            // When user clicks on this button, it will trigger a redirect to SphereOne Login.
            signInWithRedirect(auth, provider);
          }}
        >
          Login!
        </PrimaryButton>
      </header>
    </div>
  );
}

const PrimaryButton = ({
  children,
  onClick,
}: {
  children: React.ReactNode;
  onClick?: (...args: any) => void;
}) => {
  return (
    <div
      style={{
        backgroundColor: "blue",
        borderRadius: "5px",
      }}
      onClick={() => { onClick && onClick() }}
    >
      {children}
    </div>
  );
};

export default App;
Step 6: Configure OpenID Connect Provider in Firebase Project
With a basic frontend code setup, we need to configure our firebase project with the correct OAuthProvider in the firebase console, so we can truly login.
In our firebase console, we should be able to add a new auth provider by clicking on Authentication. If you cannot find Authentication in the left-side panel, then you can expand on Build section underneath and select Authentication from there.
In the screenshot below, we have an OAuthProvider already configured ahead of time - SphereOne - , but for those following along, let's go ahead and click on Add new provider button in the top right corner.

The firebase console should've given you a list of auth providers to choose from. Ranging from google to microsoft, the one we want is on the far left-hand side, called OpenID Connect. If you select it, you should see a screen similar to the screenshot below.
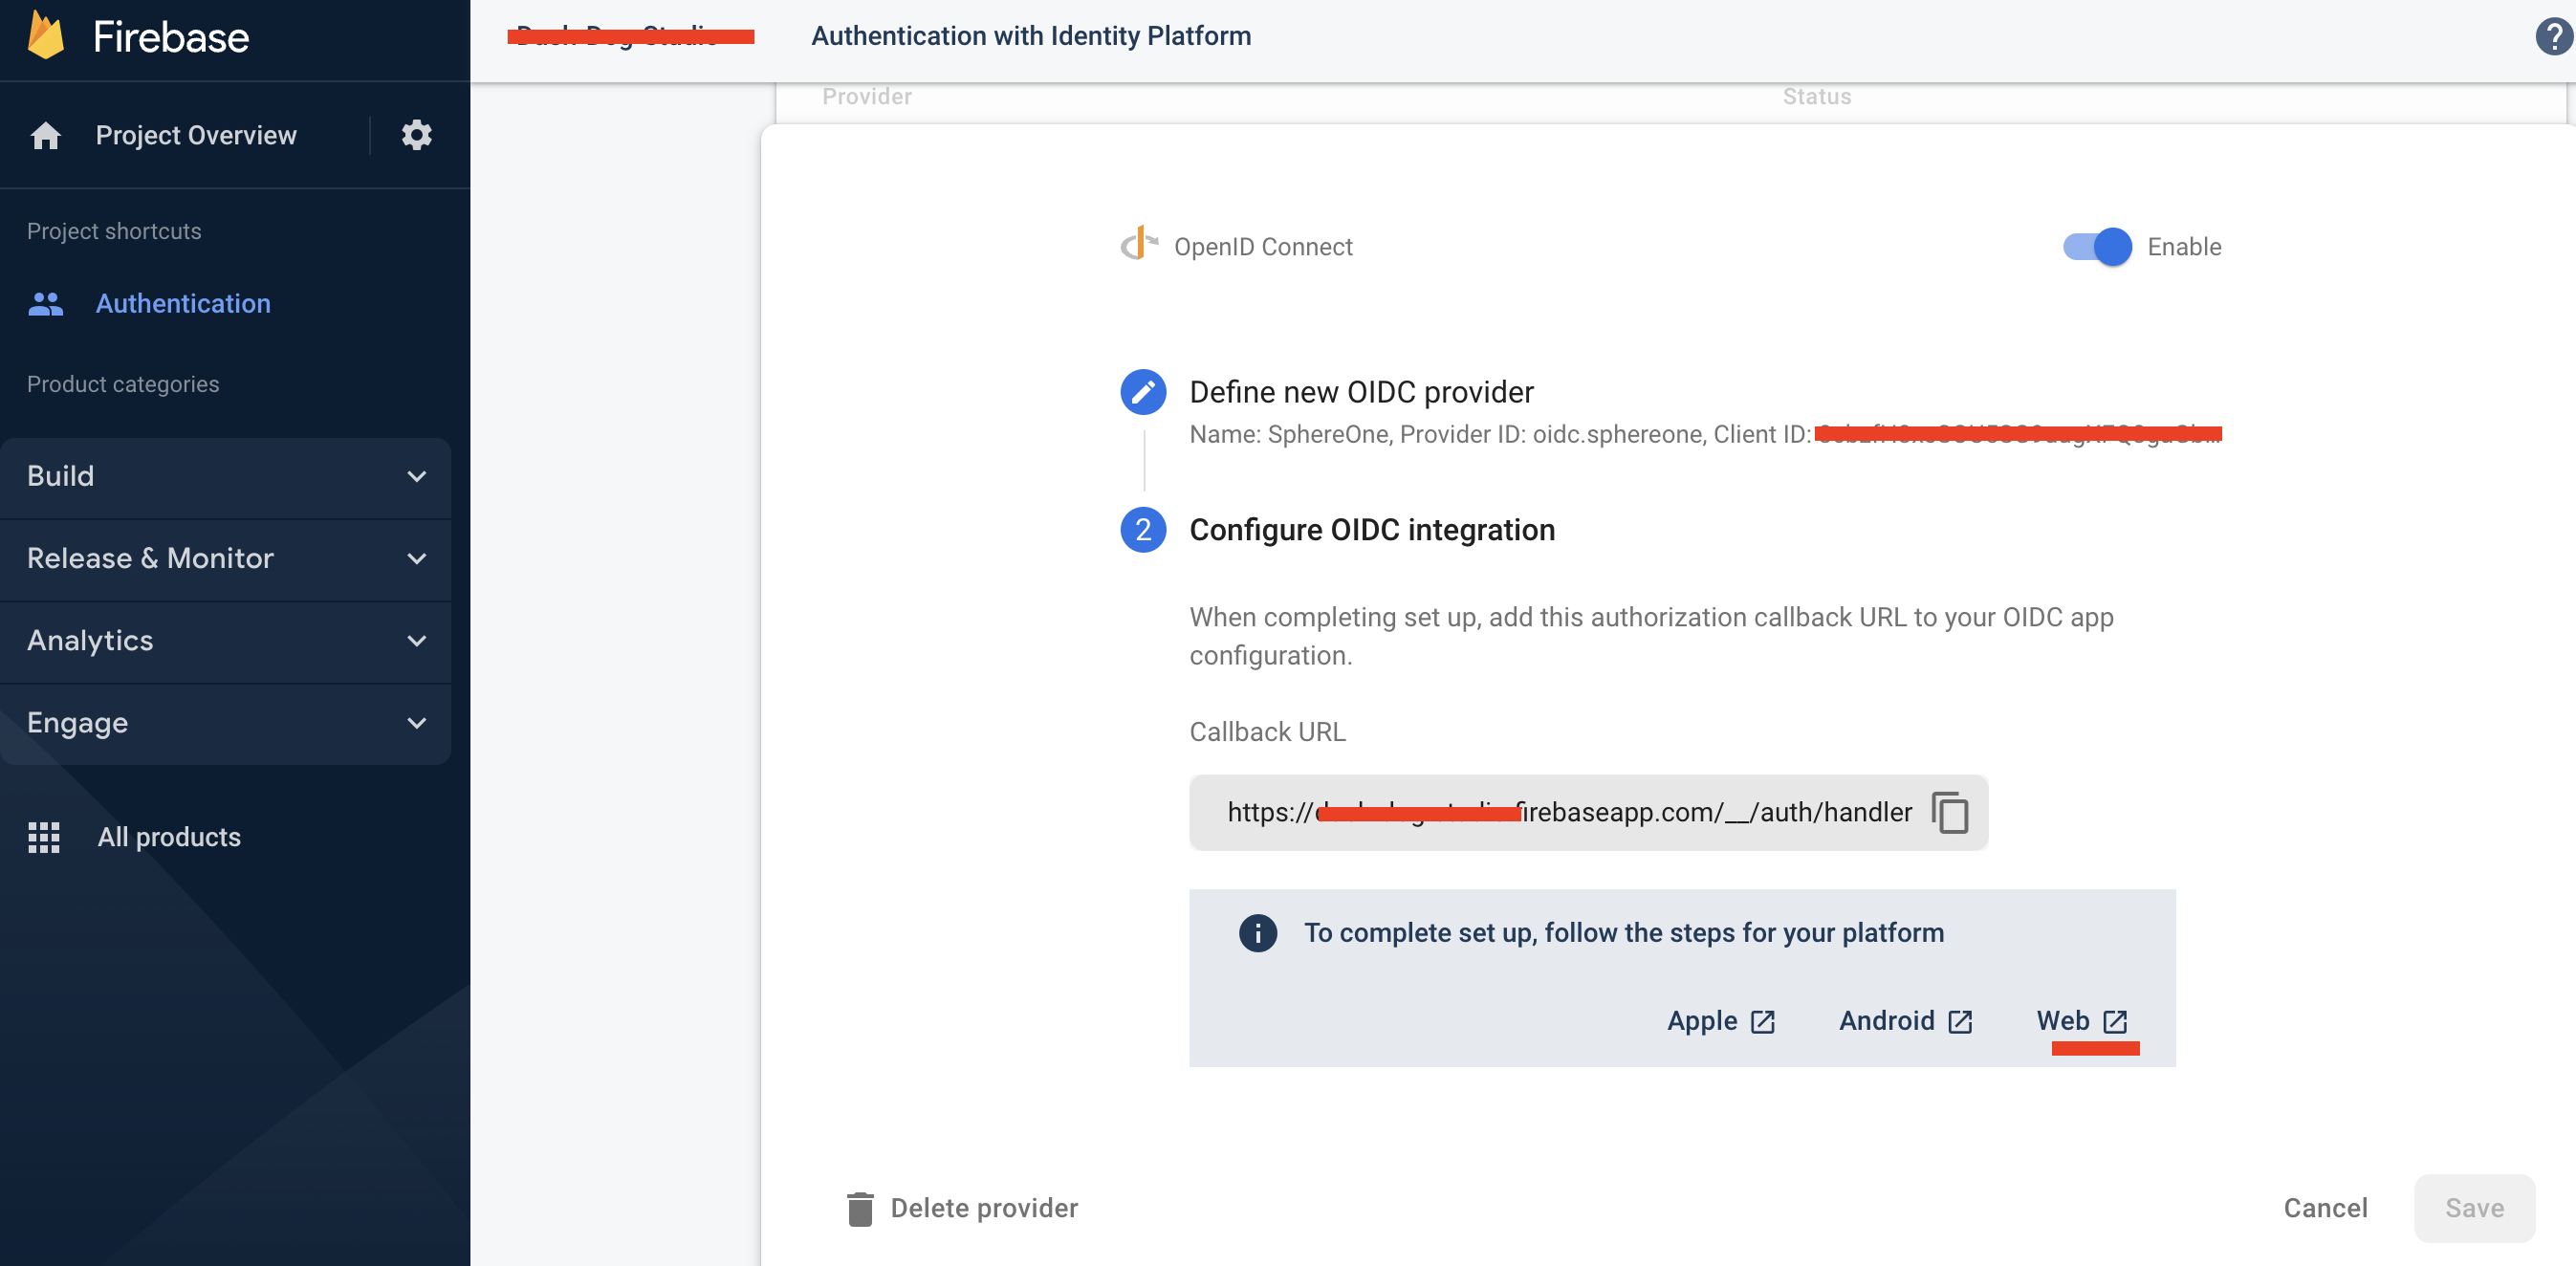
Also, we should give it a name. For our example, we've configured it as "SphereOne". And the providerID generated for us is: oidc.sphereone.
This providerID is what we are going to reference when the frontend when creating the OAuthProvider, in our latest code example above.
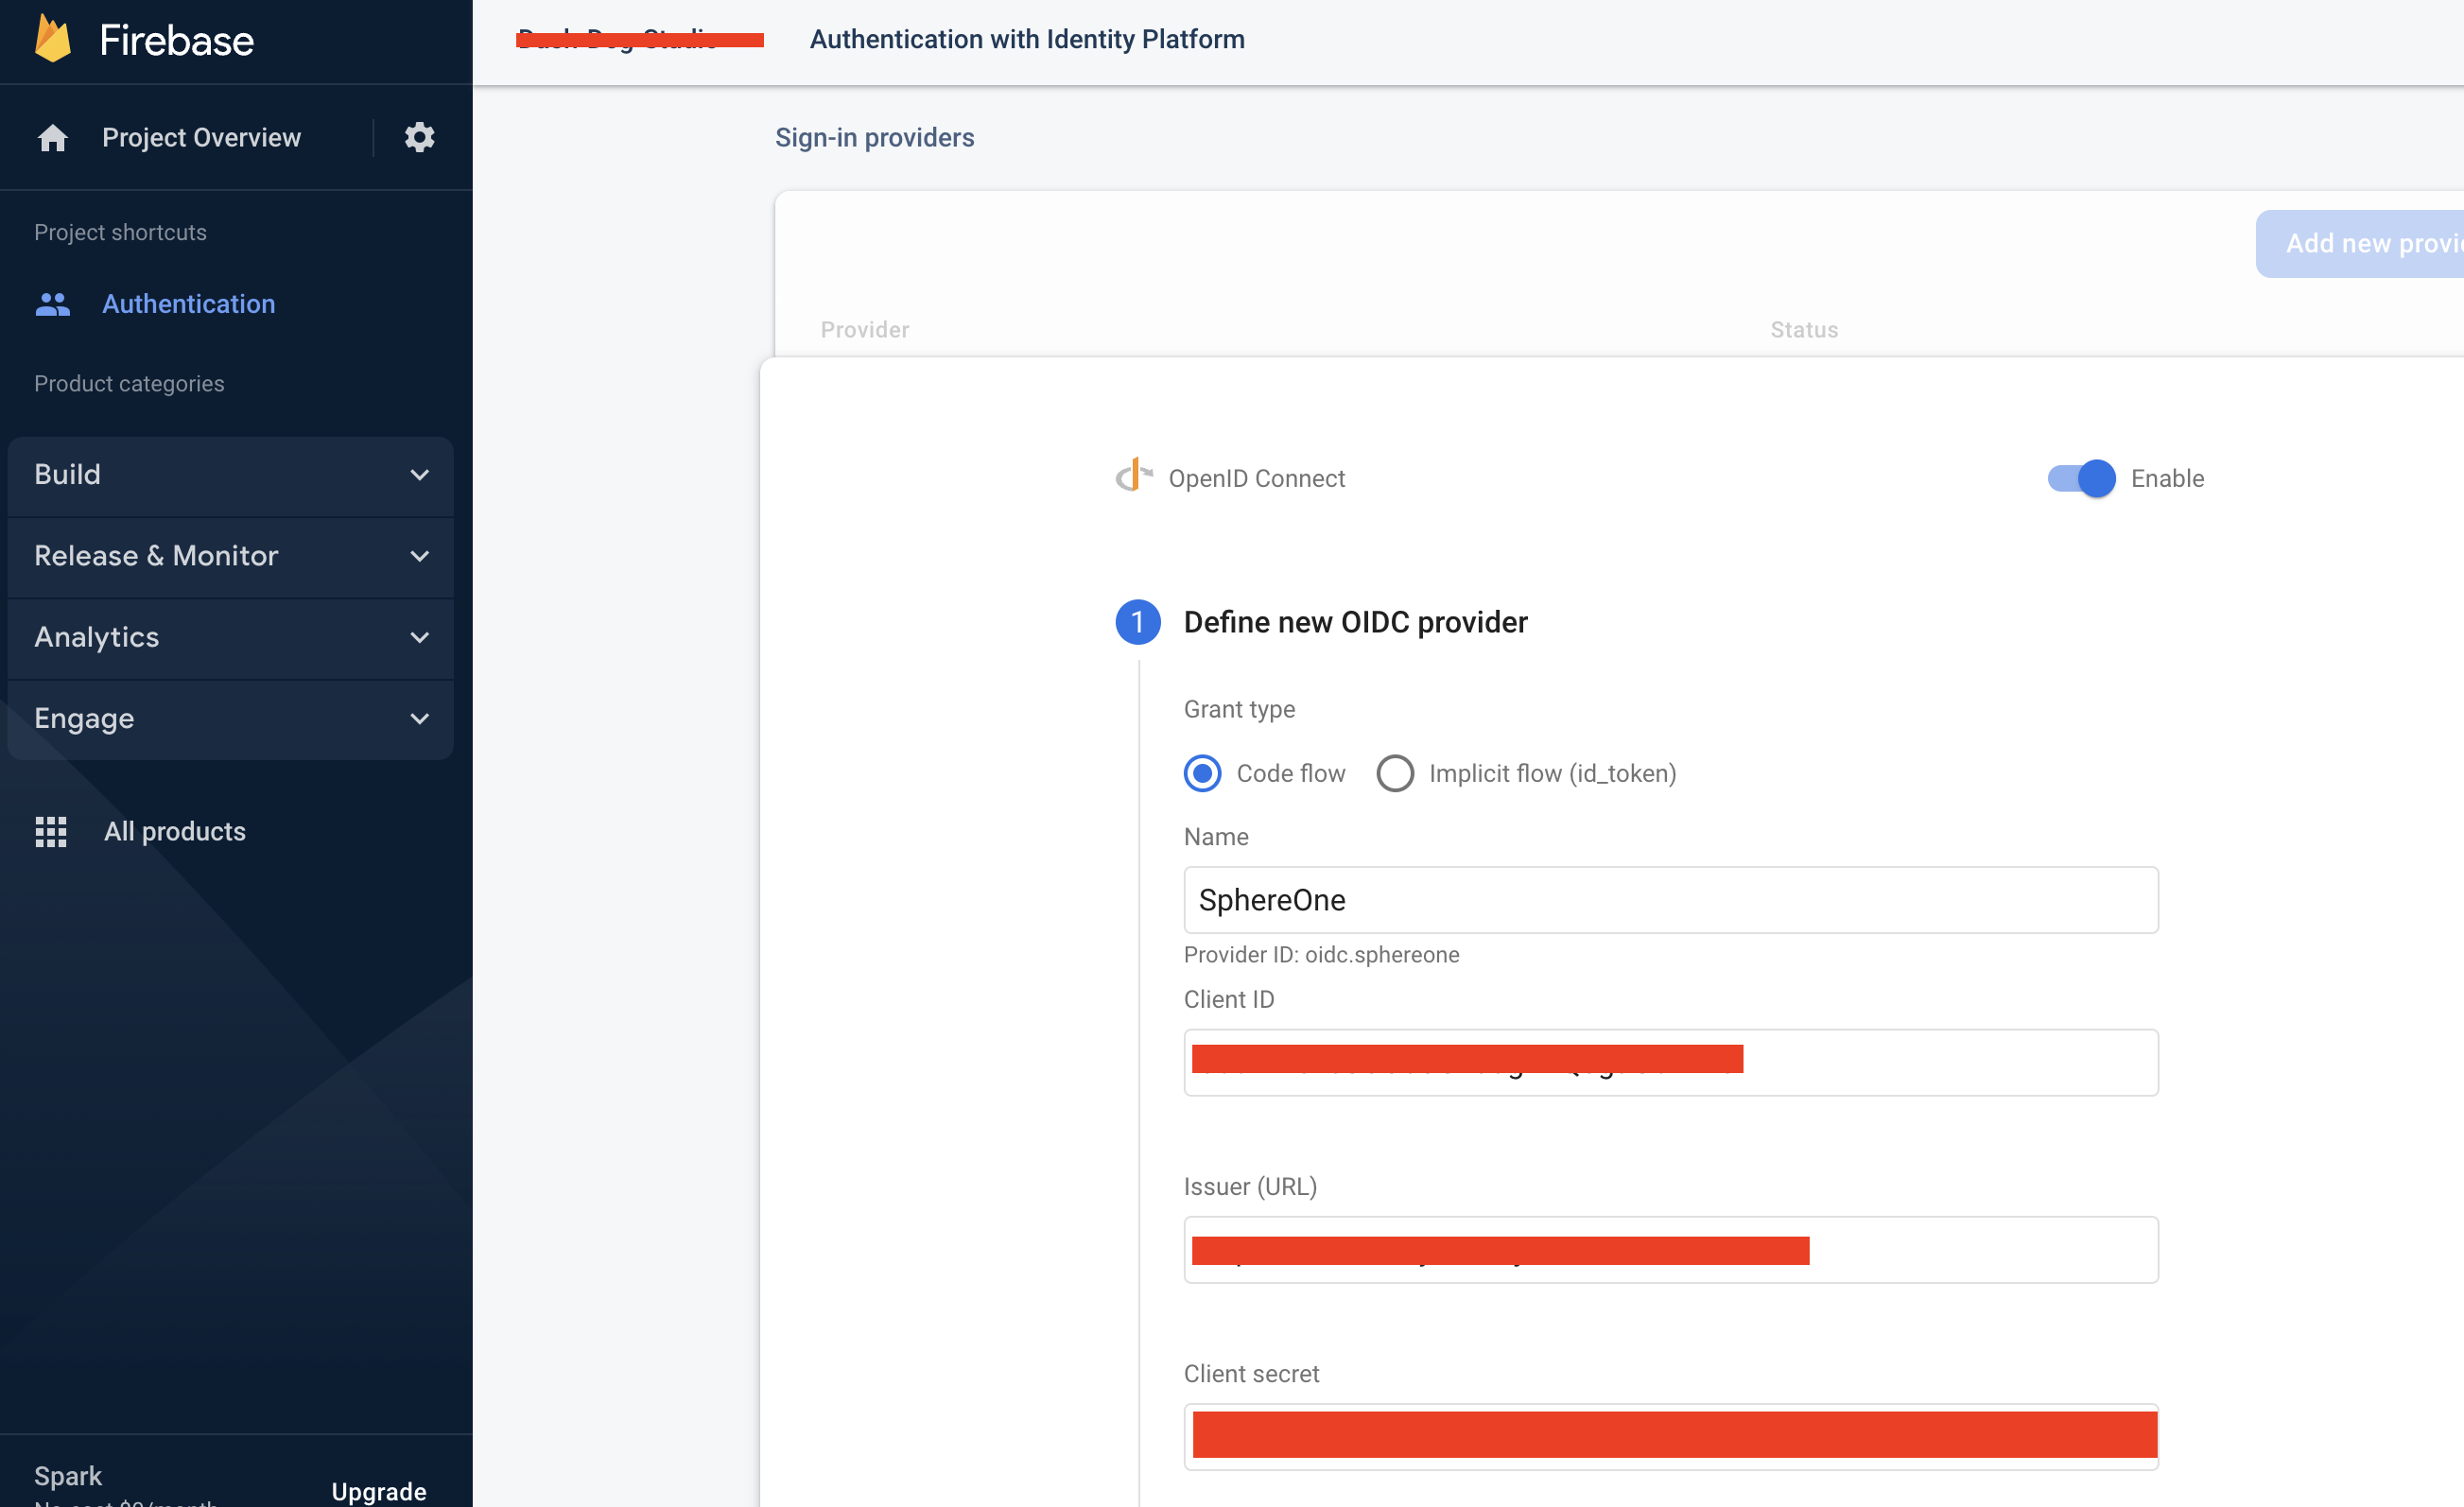
Since we've already created our OAuthProvider beforehand, the values will already be filled. But for those following along, it will offer blank inputs for you to enter the Client ID, Issuer (URL), and Client secret.
To obtain those values, you would need to contact SphereOne for further assistance and receive values specific for your need. Once you have those values and created your OAuthProvider inside of firebase, you would need to tell SphereOne about the redirect_uri that's generated by firebase.
In the screenshot below, once you've defined your OAuthProvider, or OpenID Connect in this case, you can click on Next and a step 2 will be presented with a callback URL. This is a redirect_uri that's absolutely necessary.
Without this redirect_uri, SphereOne Login auth provider won't recognize that it comes from a reliable source or won't know how to redirect the auth result back to the client-side. Thus, this callback_URL/redirect_uri must be told to SphereOne to add it to their whitelist to enable this firebase project to sign into SphereOne.
With the above configurations finished, let's go back to our frontend.
Step 7: Get Auth Result from Login
We can sign in now, but what we truly need from the SphereOne Login are the idToken and access token. In order to get it from our login, we need to add one more piece of code to our App.tsx file.
import React, { useEffect } from 'react';
import logo from './logo.svg';
import './App.css';

// We need to also import 'getRedirectResult'.
import { OAuthProvider, signInWithRedirect, getRedirectResult } from "firebase/auth";
import { auth } from './utils/firebase';

function App() {
  // This correlates to the "providerID" for our OpenID Connect provider in the Firebase Console.
  const provider = new OAuthProvider('oidc.sphereone');
  const [isSignedIn, setIsSignedIn] = React.useState(false);

  useEffect(() => {
    getRedirectResult(auth)
      .then(async (result) => {
        try {
          // The result can sometimes come back as 'null'. Thus, this check is necessary.
          if (!result) return new Error('No results');

          // We create the 'Credential' object based on the results we received from login.
          // And from there, we simply extract the `idToken` and `accessToken`.
          const credential = OAuthProvider.credentialFromResult(result);

          const accessToken = credential!.accessToken;
          const idToken = credential!.idToken;
          // For this example, we're preventing them out to the Console.
          // But we would want to save this somewhere, so we can reuse it later.
          console.log(`accessToken: ${accessToken}`);
          console.log(`idToken: ${idToken}`);
          // Once we get the idToken and accessTokens, we say that we're officially signed in.
          setIsSignedIn(true);
        } catch(e: any) {
          console.log("Credential Error: ", e);
          // Or, else, we are not officially signed in.
          setIsSignedIn(false);
        }
      })
      .catch((error) => {
        console.log("Redirect Result Error: ", error);
        // Any issues during the login process will not enable us to sign in.
        setIsSignedIn(false);
      })
  }, []);

  return (
    <div className="App">
      <header className="App-header">
        <img src={logo} className="App-logo logo-spin" alt="logo" />
        {isSignedIn ? "You are signed in!" : "You are not signed in!"}
        <PrimaryButton
          onClick={async () => {
            console.log('You clicked Login!');
            // When user clicks on this button, it will trigger a redirect to SphereOne Login.
            signInWithRedirect(auth, provider);
          }}
        >
          Login!
        </PrimaryButton>
      </header>
    </div>
  );
}

const PrimaryButton = ({
  children,
  onClick,
}: {
  children: React.ReactNode;
  onClick?: (...args: any) => void;
}) => {
  return (
    <div
      style={{
        backgroundColor: "blue",
        borderRadius: "5px",
      }}
      onClick={() => { onClick && onClick() }}
    >
      {children}
    </div>
  );
};

export default App;
Currently, this is how the SphereOne Login integration is done in a new ReactJS project with Firebase, from scratch.
If you have any questions, feel free to reach out to SphereOne.
Web SDK
Another option for clients who want to integrate SphereOne Login and other functionalities is through SphereOne's typescript/javascript WebSDK.

Let's get started.
Installing the SDK
Currently, the SphereOne WebSDK is unavailable through NodePackage Manager as a standard Node Package. So, developers would need to install through node by stating the SphereOne's Github organization and the library name.
To install through npm:
npm install github:SphereGlobal/WebSDK#main
Or yarn:
yarn add github:SphereGlobal/WebSDK#main
Or, if developers want, they can directly add it into their package.json and then npm install or yarn add:
{
  "name": "test-sphereone-web-sdk",
  "version": "1.0.0",
  "description": "",
  "main": "index.js",
  "scripts": {
    "test": "echo \"Error: no test specified\" && exit 1"
  },
  "author": "",
  "license": "",
  "dependencies": {
    "websdk": "github:SphereGlobal/WebSDK#main"
  }
}
Getting Latest Updates
To get the latest updates from the SphereOne WebSDK, developers would need to manually run the below command again:
npm install github:SphereGlobal/WebSDK#main
This should pull the latest changes and update the .lock file.
Initializing the SDK
To initialize the SphereOne WebSDK in a new project or existing project, we need to import and instantiate the WebSDK.
import WebSDK, { LoginBehavior } from "websdk";

const clientId = "your-client-id";
const redirectUri = "your-website-redirect-uri";
const apiKey = "your-merchant-api-key";

export const sphereoneSdk = new WebSDK(clientId, redirectUri, apiKey, LoginBehavior.REDIRECT);
Many of the values needed to initialize the WebSDK, please reach out to SphereOne in order to get the correct values.
Amongst the values to initialize the WebSDK:
your-client-idis necessary for SphereOne to identify that the invoker belongs to this particular client.setLoginTypeis necessary to define how the login experience will be. Based on theLoginBehavior, slight code modification is necessary to make login successful. Possible values are:LoginBehavior.POPUP,LoginBehavior.REDIRECT,POPUP,REDIRECT. For now, should always beREDIRECT.your-merchant-api-keyis necessary to for certain SphereOne WebSDK API calls, identifying the invoker to be a legitimate merchant within SphereOne's systemyour-website-redirect-urlis necessary for the login process to know where to send the authentication response back
Login
When initializing the WebSDK, to login the user, developer can call this SphereOne WebSDK method: login()
import { sphereoneSdk } from "./your-implementation-file";

// login function for button onClick
const login = async () => {
  try {
    await sphereoneSdk.login();
  } catch (e: any) {
    console.error(e);
  }
};
This will trigger the login functionality with the WebSDK. It will redirect user to SphereOne's login screen, and user can proceed from there, with similar experience as SphereOne's applications.
To listen and get the response back from the authentication and also know if user is signed in or not:
// something to track user's sign-in state with SphereOne on client-side
const [isLoggedIn, setIsLoggedIn] = useState(false);

// hook to listen for authentication response
useEffect(() => {
  const handleAuth = async () => {
    const authResult: any = await sphereoneSdk.handleCallback();
    if (authResult.access_token) {
      const { access_token, profile } = authResult;
      setIsLoggedIn(true); // handle authentication with your database
    } else {
      setIsLoggedIn(false);
    }
  };
  handleAuth();
}, []);
The WebSDK will internally store and keep track of the accessToken returned from the authentication. So, there's no need for developers to explicitly store the accessToken.
Get User Info
Once user is successfully signed in, all user information, wallets, and their balances will be loaded into the SphereOne Sdk.
To get user info, developer can call this SphereOne WebSDK method: getUserInfo()
const getUserInfo = async () => {
  const userInfo = await sphereoneSdk.getUserInfo({ forceRefresh: false });
  console.log("userInfo", JSON.stringify(userInfo));
};
The example simply prints out the userInfo of the current signed-in user to the console.
If developers want to pull latest updates for user wallets, they can utilize the same call as above and pass { forceRefresh: true } as a parameter.
If { forceRefresh: true } is not passed, then what's returned by getUserInfo will be what's currently stored/cached in the SphereOne WebSDK.
Get User Wallets
To get user wallets, developer can call this SphereOne WebSDK method: getWallets()
const getUserWallets = async () => {
  const userWallets = await sphereoneSdk.getWallets({ forceRefresh: false });
  console.log("userWallets", JSON.stringify(userWallets));
}
This method follows similarly to the getUserInfo example above.
Get User Total Balances
To get user total balances, developer can call this SphereOne WebSDK method: getBalances()
const getUserTotalBalance = async () => {
  const userTotalBalance = await sphereoneSdk.getBalances();
  console.log("userTotalBalance", JSON.stringify(userTotalBalance));
};
This method follows similarly to the getUserInfo example above.
To Sign Out
To sign out of SphereOne, please invoke the SphereOne WebSDK's logout functionality.
import { sphereoneSdk } from "./your-implementation-file";

const logout = () => {
  try {
    sphereoneSdk.logout();
    setIsLoggedIn(false); // set internal state on client side to false
  } catch (e: any) {
    console.error(e);
  }
};
This should clear the current login session, and allow user to re-login again.
Unity SDK
TBD.
Unreal SDK
TBD.
Updated 3 months ago
The next step in initiating a transaction is to create a charge.