
Quickstart: Add a Wallet
How to add a Crypto Wallet into SphereOne
When a user logins into SphereOne, SphereOne creates free non-custodial wallets for EVM, Polygon, and Solana, by default. If a user has an external wallet that they want to bring into SphereOne, then they can leverage one of two methods available.
SphereOne Wallet Site
One of two methods currently available is through the SphereOne Wallet site. For this method, user can add their personal crypto wallets, such as a MetaMask or Phantom wallet.
When user signs into the SphereOne Wallet site, user can access the "Profile" section, where they will be able to see a list with personal settings.

To recover or add one's personal crypto wallets into SphereOne, user would need to select "Recover wallet."
A new screen should be presented to the user, shown below. On this screen, user can enter either the private key or the 12-word recovery phrase of their personal crypto wallets.

For Ethereum crypto wallets though, if user enters the private key instead of the 12-word recovery phrase , then user need to check if their private key has 0x in front. If not, then before user enters their private key, user needs to add 0x in front.
For example:
If userA has a MetaMask wallet and wants to import it into SphereOne using their private key - 12342abcd87EB73f810327134aaaabbbcc111223.
When userA enters their private key into SphereOne, userA will have to enter this: 0x12342abcd87EB73f810327134aaaabbbcc111223.
NOTE: User will need to enter a their PIN code to proceed with the import action.
For Immutable crypto wallets, there is an extra step that needs to be done, due to how a single Immutable wallet can only be registered with a single account or private key. As a result, if a user adds an Immutable crypto wallet into SphereOne, they will be prompted with the message below for user to also enter their Starknet Private Key.
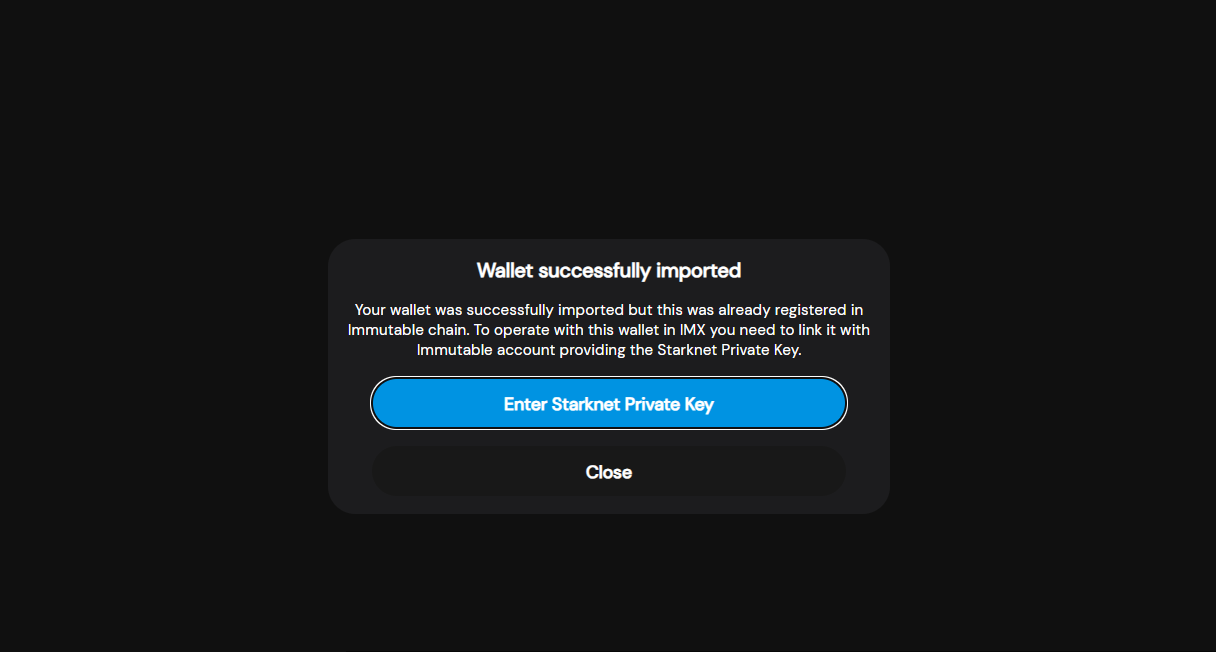
If user has their Starknet Private Key, then they can click on Enter Starknet Private Key button in order to get an open input for them to enter the value.
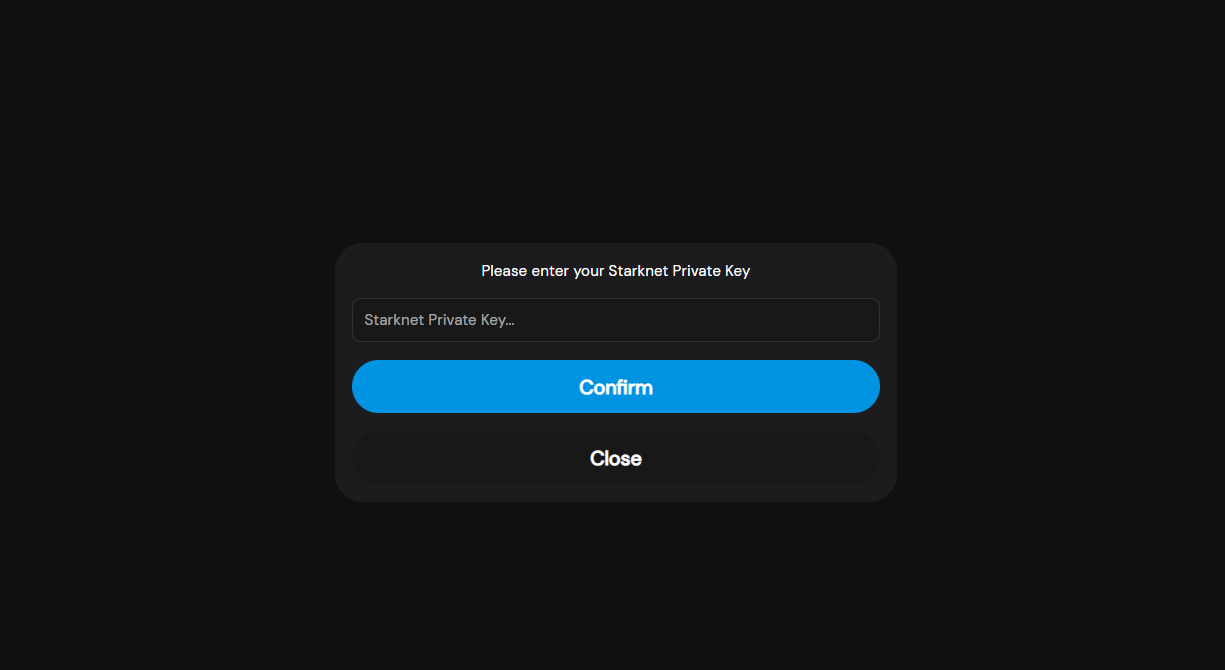
When the Starknet Private Key has been added and confirmed, then their Immutable crypto wallet can be fully recovered and registered with SphereOne, shown alongside with other wallets in the previous "Linked Accounts" screen.
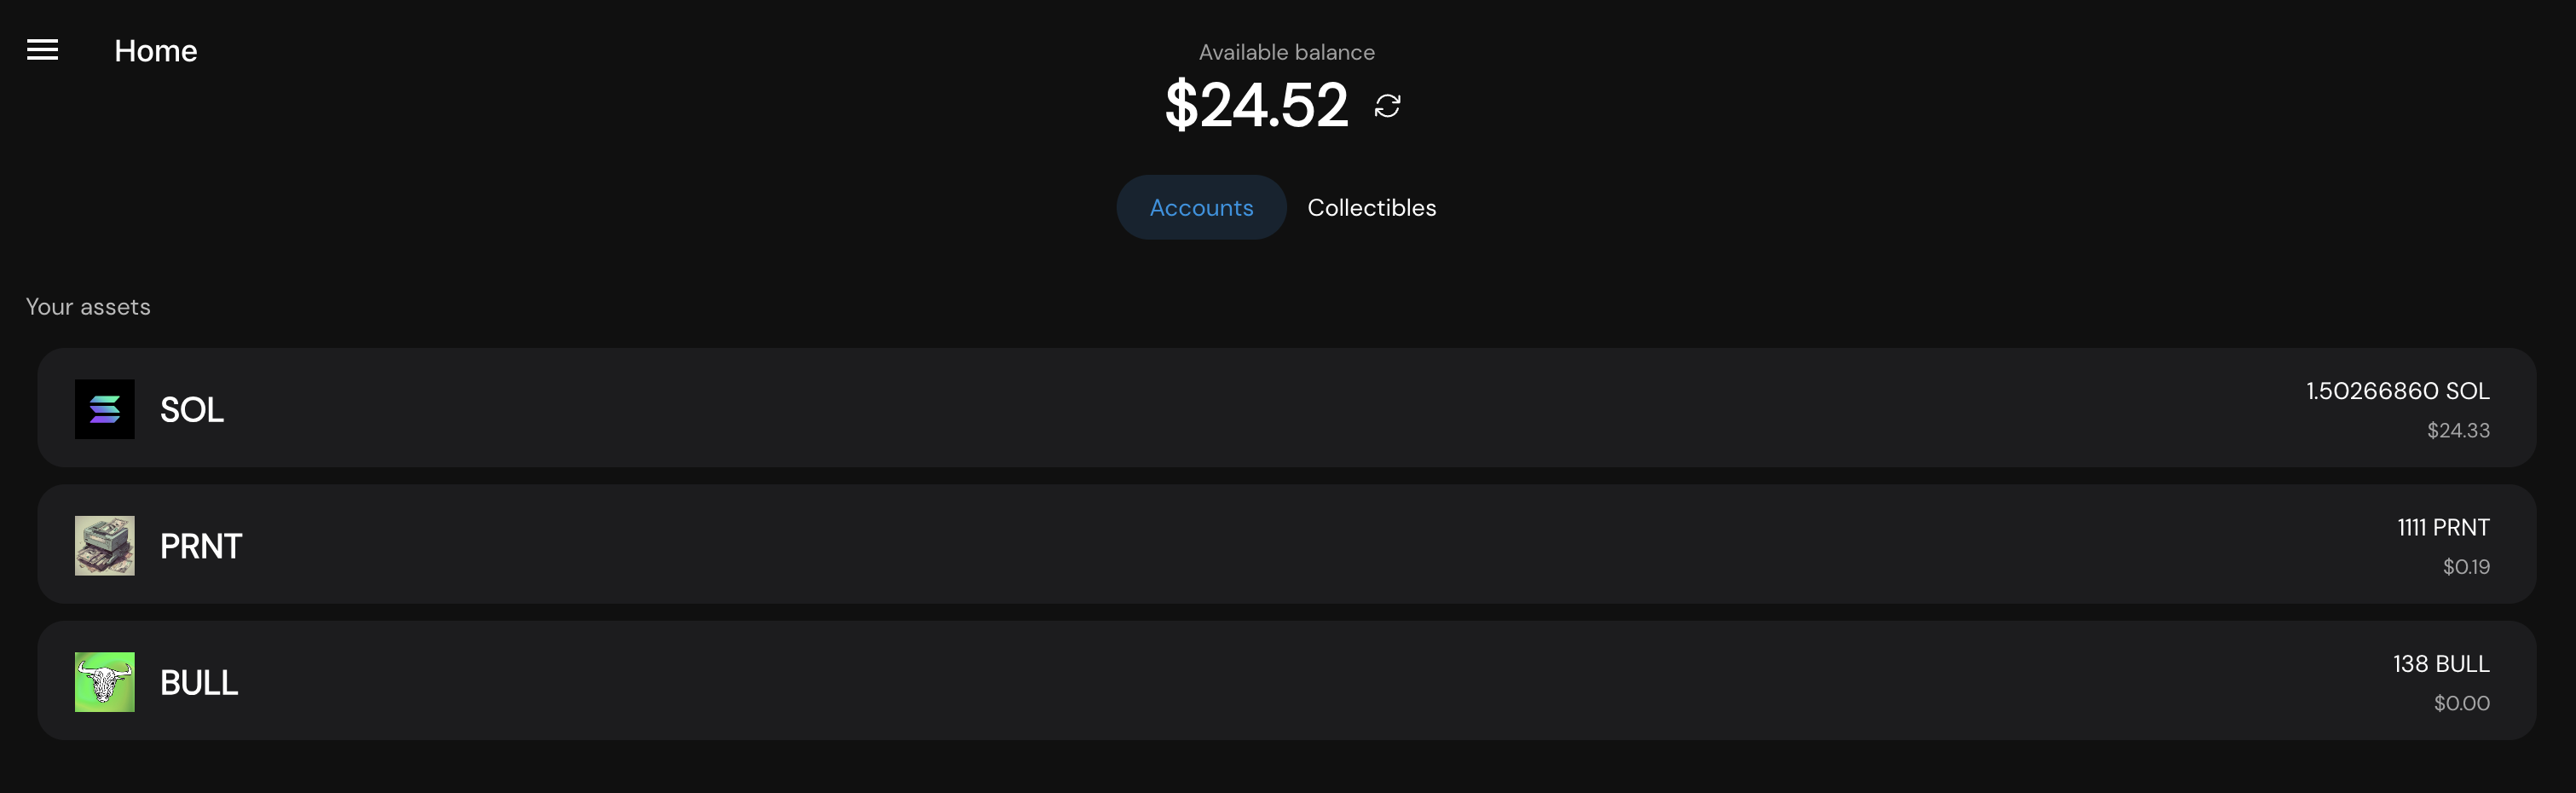
Once the crypto wallet has been added, their assets can be viewed in the "Home" screen, if they have any, as shown below:
Add Wallet API
In the previous section, we discussed one of two methods to add a personal crypto wallet into SphereOne via the SphereOne Wallet site. In this section, we will discuss the other available method to add a wallet into SphereOne. This is through the Add Wallet API call.
Crypto wallets added by the Add Wallet API endpoint have read-only access, meaning that, the added crypto wallets can only be viewed by SphereOne and referenced as the "receiver" in a payment flow but not as the "payer". This API endpoint was created to support for custodial crypto wallets.
Since the Add Wallet API is simply an API call, there's no actual UI currently available. Postman is a good and recommended IDE to make API request calls.
Here is a SphereOne API reference link to try out the API endpoint to add a crypto wallet. But it will also be elaborated more here as well.
The endpoint to invoke this functionality is: https://api-olgsdff53q-uc.a.run.app/addWallet.
The API method is POST. For the requestBody in POST call, we will discuss further down below.
The Add Wallet API should only be utilized by a merchant member. With this API endpoint, someone can add another's crypto wallet into SphereOne.
SphereOne has limited who can/cannot perform the admin-like capability to add crypto wallets via API. In order to successfully invoke the Add Wallet API endpoint, the invoker needs to satisfy these conditions:
- Needs to be a Merchant. This can be resolved by going through the Getting Started doc.
- Needs to have a proper
Merchant API key. This can also be resolved by going through the Getting Started doc.- For this condition, there are additional restrictions. With a
Test API Key, a merchant can only add their own crypto wallets. Whereas, with aProduction API Key, a merchant can add crypto wallets for themselves and other users.
- For this condition, there are additional restrictions. With a
- The user to which the merchant is adding the wallet needs to have a valid
access tokenand pass it in the request headers along with theProduction API KeyorTest API Key. This can be resolved by going through the Quickstart: Login doc.
{
  headers:{ authorization: Bearer ${accessToken}, "x-api-key": "apiKey"}
}
If the above conditions are satisfied, then the merchant can invoke the Add Wallet API endpoints with the required values in the API request. Below is an example request body necessary for the Add Wallet API.
{
"walletAddress": "CRYPTO_WALLET_ADDRESS",
"chains": ["ETHEREUM", "BINANCE", "POLYGON"],
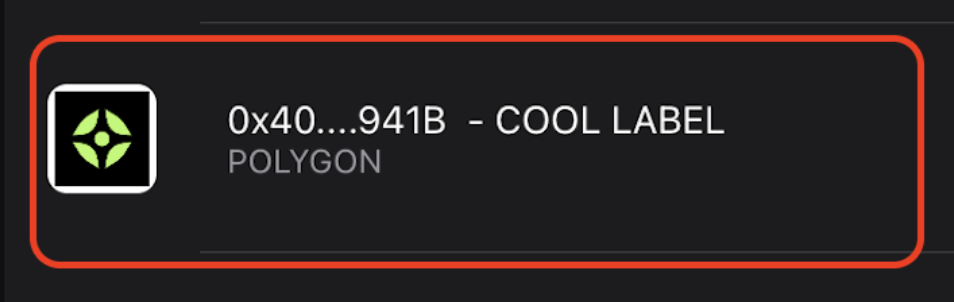
"label": "COOL_LABEL" // OPTIONAL
}
The above request body requires:
Wallet Address- the address of the crypto wallet that will be added into SphereOne.Chains- to specify what this crypto wallet will be available for what chain transactions in SphereOne. Also, it must match what the crypto wallet actually is. If a merchant is adding a MetaMask wallet for user192 through the Add Wallet API, then thechainsmust match with Ethereum and its derived chains, likePOLYGON,BINANCE,AVALANCHE, etc.Label- to add a label to the wallet, which will be display beside the public address. This field is optional
A successful response when a wallet has been added into SphereOne via Add Wallet API will look something like:
{
  "data": "Wallet added successfully",
  "error": null
}
Add Wallet via SphereOne WebSDK
In the recent section, we discussed about invoking the Add Wallet API endpoint. This can be achieved by making an HTTP call within code, such as axios for many web clients.
In this section, we will briefly discuss how to add a wallet by the SphereOne WebSDK. The steps to initialize the SphereOne WebSDK can be found here: Quickstart: Login - Web SDK. And much of the setup is the practically the same.
But a quick recap:
To install the SphereOne WebSDK via npm, or get the latest updates:
npm install github:SphereGlobal/WebSDK#main
Initializing the WebSDK:
import WebSDK, { LoginBehavior } from "websdk";

const clientId = "your-client-id";
const redirectUri = "your-website-redirect-uri";
const apiKey = "your-merchant-api-key";

export const sphereoneSdk = new WebSDK(clientId, redirectUri, apiKey, LoginBehavior.REDIRECT);
Login with the WebSDK:
import { sphereoneSdk } from "./your-implementation-file";

// login function for button onClick
const login = async () => {
  try {
    await sphereoneSdk.login();
  } catch (e: any) {
    console.error(e);
  }
};
Listening to the Authentication Result:
import { sphereoneSdk } from "./your-implementation-file";

// something to track user's sign-in state with SphereOne on client-side
const [isLoggedIn, setIsLoggedIn] = useState(false);

// hook to listen for authentication response
useEffect(() => {
  const handleAuth = async () => {
    const authResult: any = await sphereoneSdk.handleCallback();
    if (authResult.access_token) {
      const { access_token, profile } = authResult;
      setIsLoggedIn(true); // handle authentication with your database
    } else {
      setIsLoggedIn(false);
    }
  };
  handleAuth();
}, []);

// login function for button onClick
const login = async () => {
  try {
    await sphereoneSdk.login();
  } catch (e: any) {
    console.error(e);
  }
};
To add a wallet with SphereOne WebSDK still requires the user to be authenticated. That much, hasn't changed.
To add a Wallet through SphereOne WebSDK:
import { sphereoneSdk } from "./your-implementation-file";
import { SupportedChains } from "websdk";

// ...

const addWallet = async () => {
  try {
    await sphereoneSdk.addWallet({
      walletAddress: "0xb79b86C766708bF861a83FA308107F712345678", // example EVM-based wallet address
      chains: [SupportedChains.BINANCE] // adding BINANCE CHAIN only
      label: "MY WALLET" // optional
    });
  } catch (e: any) {
    console.error(e);
  }
}
The primary difference between previous and current section, is: the SphereOne WebSDK is managing the state of the access token and id token.
In the previous section, the user, or a developer in this case, would have needed to manage the validity of the access token and id token.
By simply calling the Add Wallet endpoint from the WebSDK, the access token and id token are internally managed, along with the rest of the user's data from SphereOne.
Updated 6 months ago